

DC 72V 60V 48V 36V 24V to DC 12V 3A 5A 8A 10A Step Down Voltage Power Converter Auto Car Motorcycle Bus Truck Buck Power Supply
DC12V 5A MAX / 36V48V(20-60V) / 12V|China Mainland
$44.24
Sale price
$44.24
Regular price
$0.00
Skip to product information


DC 72V 60V 48V 36V 24V to DC 12V 3A 5A 8A 10A Step Down Voltage Power Converter Auto Car Motorcycle Bus Truck Buck Power Supply
$44.24
Sale price
$44.24
Regular price
$0.00
Description
SPECIFICATIONS
Brand Name: GYVRM
Certification: CE,FCC,RoHS
Choice: yes
High-concerned chemical: none
Model Number: GYVRM JDSXX1203-10
Origin: Mainland China
Output Current: 3A/5A/8A/10A
Output Frequency: 50HZ
Output Power: 1 - 75W
Output Type: SINGLE
Performance: Waterproof/Dustproof/Moistureproof/Shockproof
Protection: Over voltage protection/ over current protection/high temperature protection/short circuit protection
Size: 64*57*22mm
Type: DC/DC Converters
Waterproof Rating: IP68
Weight: 110g
is_customized: Yes
semi_Choice: yes
Product parameters
DC-DC 24V(15-40V) TO 12V 3-10A

DC-DC 36V48V(20-60V) TO 12V 3-10A

DC-DC 36V48V60V(20-72V) TO 12V 3-10A

DC-DC 72V(30-90V) TO 12V 3-10A

Instructions
Applications
Wide range of applications: Industrial automation control. Research equipment, LED lighting, industrial control equipment, car equipment, power equipment, instrumentation equipment, medical equipment, refrigeration empty purifier,Electronic refrigerator, liquid crystal display, LED display, audiovisual product, security imported computer chassis, digital products and various instruments and other fields。
User's Manual
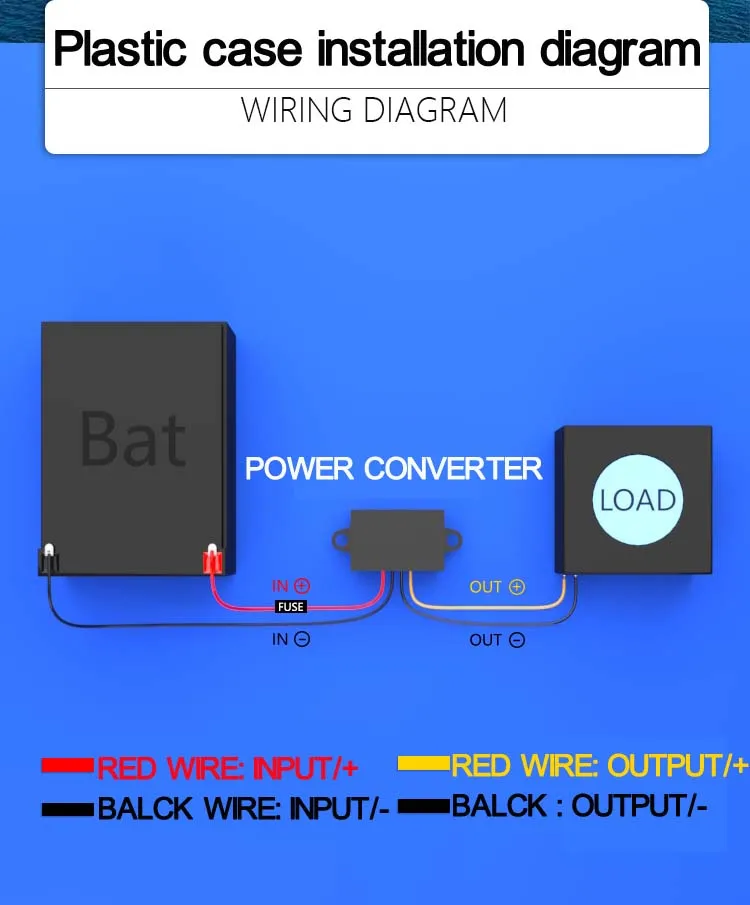
The 24V,36V,48V,60V,72V battery voltage is converted to a 12V DC voltage.
Precautions (Uncertain installations, please contact our company before installation)
!!!Long-term use cannot be fully loaded, please reduce power or choose more powerful products, best 50% of maximum power.
1. Make sure that all the polarity is correct, and the anti-negative conversion converter (except for input tape reverse protection)
2. Make sure the cable is pure copper wire, the input and output cables cannot exceed 2 meters, and the output will be removed by more than 2 meters. The voltage will be reflected. If the line is extended, you need to increase the line diameter according to the corresponding multiple.
3. The cable needs to be connected to the thread, please refer to the wire diameter size and securely connected.
4. The input terminal is required to connect the fuse or air switch, and you need to select the corresponding fuse or switch] (except the input belt fuse)
5. Make sure the battery capacity is large enough to provide sufficient energy. If the input energy is not enough, the voltage will be reduced.
6. Make sure the installation environment is well ventilated, so as not to protect over temperature protection, limit current output
7. Cannot connect directly to solar panels or wind wind turbines
8. Non-charged models cannot be charged battery and lithium batteries
9. When connecting the input test with DC power supply, the input should not exceed the voltage range of the battery, and no overvoltage protection (can be customized).
Installation step (four lines or four / five terminals)
1. Turn off all power supplies and load switches
2. Before the wiring, pay attention to all positive and negative poles
3. Connection (OUTPUT-) to load negative, connection (OUTPUT +) to load positive
4. Connect the fuse or air switch to (Input +) input the positive cable, then connect (Input +) to the battery positive, connect (Input-) to the battery negative electrode
5. Make sure all positive and negative connections are correct (do not reverse, reverse the burnback converter), turn on the power and load switch
(Note: If the ACC port is connected, connect the ACC to the ignition switch: If you do not need to use the ACC function, connect the ACC to the (Input +) battery "positive.)
troubleshooting
1. Output no voltage, please check if all lines are connected firm, the battery is enough, whether the fuse is burning.
2. Output the voltage, check if the load start current is too large, the ventilation is good, whether the outer casing is heated, whether the cable and the thread are selected and installed, whether it is less than 2 meters, and the input battery has sufficient energy.
Free Shipping Over $199
- Standard Shipping: Standard Shipping (12–18 Business Days)
- Express Shipping: Expedited Shipping (5–9 Business Days)
- Free Shipping: Orders over $199 qualify automatically
- Tracking: Full tracking number provided for all orders
30-Day Return Policy
- Returns: 30-day hassle-free return window
- Condition: Items must be unused and in original packaging
- Refund: Full refund processed within 3-5 business days
Why Choose Us?
- Factory Direct: ISO/TS 16949 certified manufacturer
- Quality: 100% electrical continuity tested before shipment
- Experience: 15+ years in automotive connector industry
- Support: Professional technical support available

You may also like
Blog posts
Title
An excerpt of your blog post's content
Title
Date|Author
Subscribe to our emails
Be the first to know about new collections and special offers.